 If you read any of my blogs or have ever seen me in my natural habitat (Coffee Shops), you know how wild I am about coffee. I could tell you how much I drink each day, I could tell you how much time I spend buying just the right beans and grinding them just the right amount of time, and I could certainly tell you how coffee fuels me body, mind, and soul for the day.
However, I’ve found the best way to sum up my love affair with coffee: Simply put, coffee is one of the great passions of my life.
My husband recently bought an Aerobie AeroPress Coffee and Espresso Maker and, basically – in doing so – he fed the flames of this coffee passion. Just how excited am I about the AeroPress? Well, take this into consideration. Normally when I write cookbook reviews, reviews for kitchen gadgets, food reviews, etc… I write them in a post on the food blog. Logical, right? But, if you’ll notice, the AeroPress has gotten its own page.
Welcome to the Big League, baby.
I’m sure you’re thinking, “I’ve seen a lot of products promising to make coffee shop quality coffee at home…. this is just another one of those.” If you’ll just stick with me for a few minutes, I’ll show you how different the Aerobie AeroPress Coffee and Espresso Maker is and how it stands out from all the other promise makers.
Bottom Line: The AeroPress doesn’t make coffee like you find in coffee houses.
It makes better coffee than you’ve probably tasted at any coffee house. It’s definitely superior to the coffee I’ve had at national coffee chains, as well as restaurants.
Great Coffee Beans are Vital.This might be a good place (right after a grand, swooping statement) to point out something vital: You have to use good coffee beans. As in the best you can afford. They make a world of difference.
Apparently a lot of people have fallen as deeply in love with the AeroPress as we have. Look at the graphic below from Amazon. As my big red arrow illustrates, the AeroPress is the Number 1 Best Seller in Coffee Presses!

As you can see, the star rating is also out of this world. I’ve used the AeroPress – and more importantly have enjoyed the fruits of its labor- for a while now and I can tell you, the only way this baby can’t have a FULL Five Star Rating (instead of the incredibly impressive 4-1/2) is one of three things:
- Someone used generic, cheap coffee.
- Someone didn’t know what they were doing.
- Someone has been drinking skanky coffee so long they have no idea what premium, rich coffee is supposed to taste like.
The instructions are beautifully laid out and are incredibly simple, so I’m hoping the problem isn’t the second one. In fact, there are many, many, many fun YouTube Tutorials showing how to use the Aerobie AeroPress. My personal favorites are by two different guys: “Coffee Nate” and “Jacob.” Their approaches are slightly different, but I think each gives you a great idea of how simple it is to make great coffee using the Aerobie AeroPress:
Aerobie AeroPress Video Tutorials
Like Coffee Nate, we also use the S Filter – an Ultra Fine Stainless Steel Coffee Filter for AeroPress Coffee Makers (pictured on the right )as opposed to the paper filters that come with the AeroPress. It’s ridiculously inexpensive and I guess we’re in the “paper liner coffee snobs” camp.

However, if you choose to use the paper filters, as Jacob pointed out, be sure to wet the filter first.
You’ll find that a lot of the YouTube Videos and written tutorials go into great detail about checking the temperature of your water, carefully measuring your coffee grounds, and even weighing your coffee.
Don’t let this intimidate you!
When I first began watching the videos and researching how to use the AeroPress, all I thought was, “There’s no way I’m going through all of that multiple times a day.” However – ironically enough – I just took about 5 minutes and made a cup of AeroPress Coffee while writing this review. Because I’ve used the AeroPress more than a few times, I know how much coffee I want to use per cup (a heaping, heaping scoopful, using the scoop that comes with the system). I also know how long I want my boiling water to sit before I add it to the AeroPress.
After a few times, you’ll have such a feel for how it’s all done, you’ll be able to do it with your eyes closed.
Tip: After you’ve gotten your Aerobie AeroPress Coffee and Espresso Maker
, take it out of its super cool box (kind of a work of cardboard art itself) and familiarize yourself with the individual pieces. Open up one of the tutorial videos above and “go through the motions” once without coffee or water. Then, go through it again and make yourself a cup of coffee that’ll rock your very foundation.
Too much time? I couldn’t have been more wrong.
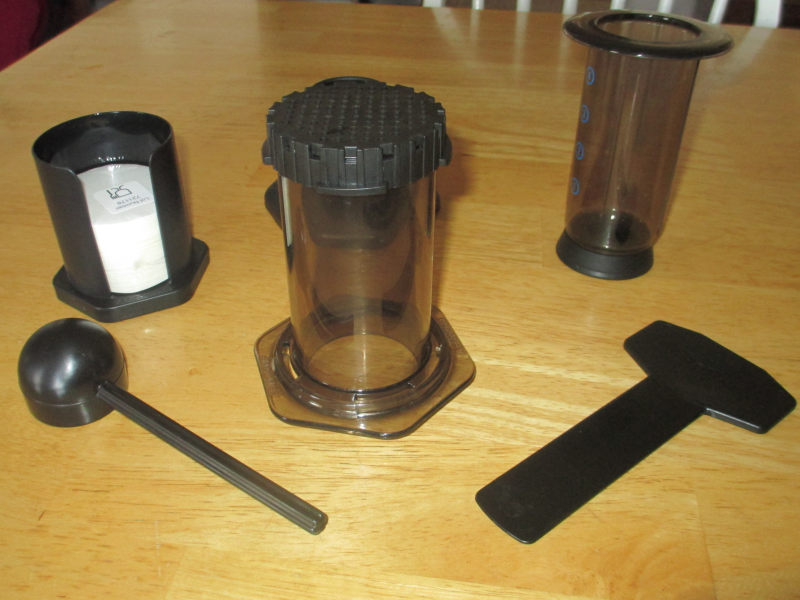
Components of the AeroPress:
- AeroPress Base, Plunger Press, & Cap – the Cap is where you place your filter. In the photo above, my AeroPress Base is already wearing the Cap.
- Paper Filters with a Very Cool Holder – you get 350 paper filters, a 1 year’s supply!
- Coffee Ground Funnel – my coffee funnel is actually sort of hidden in the picture above. Who set up this photo shoot?! Oh… that’s right.. never mind.
- Coffee Ground Scoop (most people find that one heaping scoop of finely ground coffee equals a Heavenly cup of coffee)
- Stirring Paddle – a lot of people use a regular old chopstick to stir the grounds. Me? I think the paddle is too cute not to use. I’m sophisticated like that.
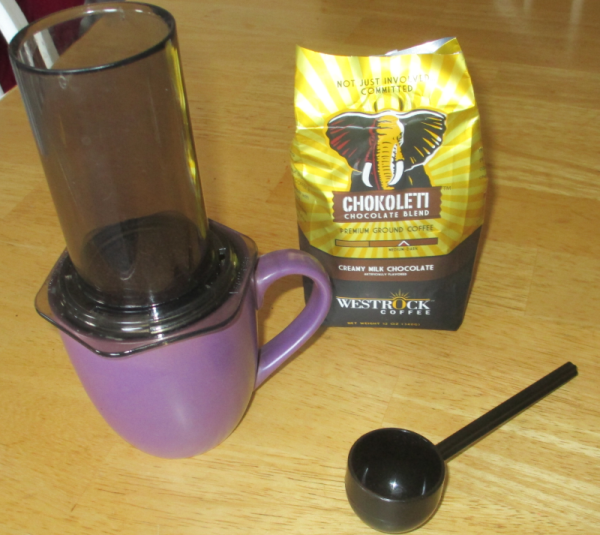
As I said earlier, I took a break as I wrote this Aerobie AeroPress Review long enough to make a great cup of coffee. We’re all fueled by something and mine, not surprisingly is coffee. Because I’m also fueled, deliciously, by chocolate, I actually brewed a cup of chocolate coffee. As you can see in the photo below, I used pre-ground coffee. I also used a brand that can be found in stores to illustrate that you CAN get great coffee in your favorite store. This brand, for example, is a new infatuation of mine. Our local Kroger only recently began carrying it and I’ve tried every variety. It’s just outstanding. It’s Westrock Coffee and it’s less than $9 a bag! It doesn’t, however, taste like it.
My favorite varieties of Westrock coffee, so far, are the Meza Morning Blend and the Chokoleti Chocolate Blend. In fact it’s the Chokoleti Chocolate Blend that I’m enjoying the heck out of right now.
I almost always add a packet of Truvia or Stevia to my cup of coffee, but this wonderfully blended coffee doesn’t need a thing. However, my inner coffee diva will often come out and I’ll grab my beloved Milk Frother and Steel Milk Frothing Pitcher. Then I froth up a little 2 Percent Milk, Half and Half, or Whipped Topping for a homemade Latte. This is as awesome with regular coffee as it is chocolate blends.
Trust me. It’s Heaven in a cup… without leaving your home!
Learn More About The Aerobie AeroPress Coffee and Espresso Maker
My inner coffee diva and I wholeheartedly urge you to read more about the Aerobie AeroPress Coffee and Espresso Maker by clicking the link. You’ll learn what makes this coffee better than the rest, how to brew your own cup of excellent coffee, and how to make sure you can have your magic maker delivered as soon as possible!
You’ll also read countless reviews about this wonderful coffee at home system.
Finally, you’ll see something that may surprise you… the price. Less than $30! If you tend to order a lot of coffee and lattes out, you probably spend that in a week or two. Needless to say, I’ve already saved MORE than enough money on “specialty drinks” to have paid for my Aerobie AeroPress Coffee and Espresso Maker three or four times over.
Take the first step in what will be your most delicious coffee experience ever today!