• Skip to primary navigation
  • Skip to main content
  • Skip to primary sidebar
  • Skip to footer

Get Cooking!

Recipes, Kitchen Gadgets, Cookbook Reviews, Gluten Free Recipes...

  • Home
    • Contact
    • About
    • Privacy Policy
    • Sitemap
    • Store
  • Reviews
    • Cookware Reviews
    • Food Reviews
      • Gluten Free Food Reviews
      • Health Food Reviews
    • Bakeware
    • Candy Reviews
    • Coffee Reviews
      • Aerobie AeroPress Coffee and Espresso Maker
      • Coffee Makers & Grinders
    • Cookbook Reviews
      • Cooking Magazines
    • Kitchen Gadgets
    • Small Kitchen Appliances
  • Gifts & Collectibles
    • Candy Bowls
    • Christmas Shopping
    • Coffee Mugs
    • Canister Sets
    • Cookie Cutters
    • Gifts for Coffee Lovers
    • Gifts for Tea Lovers
    • Owls in the Kitchen
    • Pig Collectors
  • Recipe Index
  • How to Be a Better Cook
    • Baked Sweet Potatoes in the Oven
    • Cooking Videos
    • PERFECT Baked Potatoes in Your Oven
You are here: Home / Archives for Reviews / Table Talk / Cooking 101: How to Cook!

Cooking 101: How to Cook!

PERFECT Baked Potatoes in Your Oven

June 3, 2022 By Joi Sigers

Baked Potatoes with Sea Salt

Baked Potatoes with Sea Salt

I’ve always loved a great baked potato. In fact, when at a favorite steak house, I’ve been known to get every bit as excited about the baked potato as I am the steak.

Oddly enough, though, I’ve recently become an EVEN bigger potato fanatic. I have no explanations as to WHY but since I began eating Gluten Free, my cravings for baked potatoes are almost non-stop.  My daughter Emily (who also recently had to begin eating Gluten Free) has similar cravings – only her potato of choice is sweet potatoes.

Although I can’t explain the increased cravings, I can certainly take care of them. It just so happens I like my own baked potatoes as well as – and often better than – potatoes gotten at restaurants.

Although it’s different from most people, I don’t wrap my potatoes in foil before putting them in the oven. To me, doing so kind of  just “steams” the potato rather than “baking” it.  I like for the skin to have a slight crispiness to it when I cut into it. If it doesn’t’ have that slight little crunch sound when the knife cuts into the potato, I don’t get quite as excited.

Step By Step To Perfect Baked Potatoes

  1. Wash your potatoes well. I have a little scrub brush (Amazon link) that looks like a pig (I mean, who doesn’t??) that I like to use on my potatoes.
  2. After they’ve been washed well, oil them down with butter, vegetable oil, or olive oil.  It’s like you have a little spa for potatoes and you’re the masseuse.
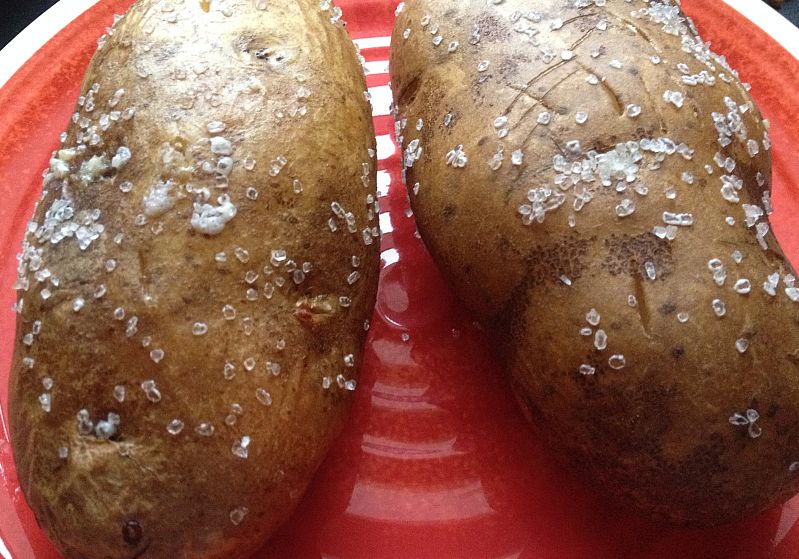
  3. I roll my greased up potatoes in a little flaky sea salt (Amazon link). Trust me, this little extra step makes a world of difference. It doesn’t make them too salty… I promise.
  4. Pierce your potatoes about 4 or 5 times to allow steam to escape. DO NOT SKIP THIS STEP.  An exploding potato is a hideous thing.
  5. Bake your potatoes directly on a rack in a 400 degree preheated oven for 45 – 50 minutes.  Place a cookie sheet on a lower rack to catch any drippings. The timing depends upon the size (density) of your potatoes.

How To Test For Done-ness:

There are several ways to check to make sure your baked potato is cooked thoroughly. Below are the most commonly used (with my own personal method listed first).

  • Use an oven mitt to give the potato a slight little squeeze. If there’s a bit of “give,” the potato is done. If there’s no “give,” return it to the oven.
  • You can also check for a potato’s done-ness by taking its temperature. The internal temperature should be 210 degrees F.
  • Some people check their baked potatoes by piercing them with a fork. If the fork doesn’t meet any resistance, they know it’s showtime.

 And showtime is a beautiful thing.


Filed Under: Cooking 101: How to Cook!, Food Blog, Vegetables Tagged With: baked potatoes, baked potatoes in salt, perfect baked potatoes

Sous Vide Turkey – The Way to Get a Perfectly Moist Turkey Every Time

November 15, 2017 By Joi Sigers

If you’ve been paying attention to food trends lately, you’ve very likely heard of sous-vide, even if you’re not completely sure what it is. Thanksgiving is the perfect time to try the sous vide cooking method.

That’s because undeniably, poultry is where sous-vide shines. Unlike red meat, which can be eaten with a gradient of done-ness so the outside is gray and the inside is pink, with poultry, you need to cook it through. With a larger cut, like turkey breast, it’s impossible to cook the inside without overcooking the outside. Sous vide allows the entire piece of turkey to cook at the same time, so it’s completely, perfectly done. It‘s amazingly flavorful and never, ever dry!

Don’t let the name intimidate you. Sous-vide (soo-veed) means ‘under vacuum,’ a reference to the way food is packed before you cook it using this method. The equipment used to cook the food is called an immersion circulator, so you’d properly say, “I’m cooking this delicious turkey sous-vide,” not “I’m cooking this delicious turkey in the sous-vide.” But I digress. Why are people going crazy for sous-vide cooking? And should you jump on the bandwagon?

The premise behind sous-vide is actually simple. In traditional cooking methods such as dry heat (baking, roasting, broiling, frying, searing) or moist heat (boiling, braising, poaching, simmering), the goal is to get the center of the food cooked to the temperature that you want it to be.

Unlike grilling, here’s how sous-vide works:

Season your food (or even add a marinade or sauce) and place it in the bag you’ll be cooking in. You can invest in a vacuum sealer or just use Ziploc® bags (Brand name bags seems to leak less).

To vacuum seal with a zip top bag, place the item in the bag, then keep the zip top open and lower the bag into the water immersion circulator. Allow the water to press the bag closed, and lower it in until just below the zipper, so all the air is now pressed out. Then, zip the top and remove the bag from the water bath.

Bring the water in the circulator to the temperature that you want your food to be, and then place the bag back in the water bath with the immersion circulator. Cook it for a predetermined time, then remove from the bag and pat dry. The sous-vide cooker circulates water around the pot. The circulation prevents hot and cool spots from forming in the water to ensure even temperature throughout your food. Your food never overcooks. It’s just how you like it, every time.

Note that there are several types and brands of precision immersion cookers ranging in price from about $119 – $169. Many can be controlled remotely via Wi-Fi and Bluetooth. Kosher.com will review several brands, prices and other accessories in future episodes.

If you already own an immersion circulator or plan to purchase one in time for Turkey day, try this great recipe from Michal Frischman for Kosher.com.

Sous Vide Lemon Herb Turkey

Sous Vide Lemon Herb Turkey

SOUS VIDE LEMON HERB TURKEY

1 2-pound (1-kilogram) boneless, skinless turkey breast, sometimes known as turkey London broil (see note)
1/4 cup honey
1/4 cup lemon juice
1 teaspoon dried dill or 1 tablespoon fresh
1 teaspoon dried parsley or 1 tablespoon fresh
1 teaspoon dried basil or 1 tablespoon fresh
1/4 teaspoon black pepper
1 teaspooon salt
2 tablespoons flour

Mix the honey, lemon juice, herbs, salt, and pepper. Place the turkey in a heavy-duty ziplock bag or in a vacuum sealer bag. Add marinade to the bag. For a ziplock, submerge the bag in a bowl of water until just below the opening of the bag so the air is squeezed out, then seal the bag. For a vacuum sealer, set the machine to wet seal.

Place the turkey in a sous-vide set to 143°F (62°C). Cook for four hours or up to eight hours.

When ready to serve, heat oil and flour in a small saucepan. Stir well and cook for one minute. Add the juices from inside the turkey bag and whisk until no clumps remain. Slice the turkey thinly and serve with gravy on the side.

Note: You can follow the same time and temperature for any size turkey you would like to use.

Variation: To cook in the oven, keep the skin on and bone in. Bake at 375°F (180°C) for about an hour or until the thickest part of the turkey breast reaches an internal temperature of 160°F (70°C). Remove and allow to rest for at least 15 minutes

About Kosher.com
Kosher.com is the premier site for kosher cooking and conversation and the place to go for all things kosher food. Less than a year old but a rising star on the kosher food scene, it has thousands of top-quality kosher recipes, articles, tips, and entertaining shows. The site is the ultimate platform for the most diverse collection of kosher recipes.

Check out the kosher.com ongoing cooking series, where they will address choosing the right times and temperatures in sous-vide cooking for a range of different foods, and much more.

You can also rely on recipes for sous-vide at www.kosher.com, at many other online resources, and on the app your immersion circulator is linked to. Over time, you will likely want to experiment and come up with recipes on your own.

Stay tuned for the entire sous-vide series only at Kosher.com. They will have you cooking like a professional chef in no time!

And, you won’t want to miss this Sous Vide Video (http://www.kosher.com/shows/video/155/two-easy-ways-to-start-cooking-next-level-ribeye) –  Watch Chef Gabe on Episode 6 of ‘Under the Hood’, only on Kosher.com. Chef Gabe takes two cuts of ribeye to the next level with his seasoning and cooking techniques. Watch as he sous vides then sears the eye of the ribeye, or Spencer Steak, and then perfectly sears a ribeye crescent. These two ribeye ideas are sure to make your next steak a winner.


Filed Under: Cooking 101: How to Cook!, Thanksgiving Recipes Tagged With: how to bake a turkey, making a moist turkey, Thanksgiving tips, Turkey

Infographic: 15 Easy Ways to Make Food Taste Better

July 11, 2017 By Joi Sigers

The infographic below (from British friends of the food blog… hence yoghurt instead of yogurt!) includes some great tips for making your food taste even better. I love these tips – several of which I personally swear by.

Below are a few quick tips from my own kitchen:

  1. When making a dish with multiple food components (stew, soup, salad…), chop the individual foods as small as possible. Sure, it’s more work (unless you use a food processor, Amazon link) but each bite will provide more flavor. After all, the more foods that can fit on a spoon or fork at once, the greater the flavor punch.
  2.  Ground Chuck simply tastes better than ground beef. There is no getting around it.
  3. In addition to Kosher salt and black pepper, a few seasonings I keep on hand at all times (as in I’m apt to run out of just about anything before I ever run out of them) are: Cumin, Montana Mex Chile Salt (as well as their Sweet Seasoning Blend), Garlic Powder, Cayenne Pepper, Red Pepper Flakes, Pink Himalayan Salt, Seasoned Salt, and McCormick’s Montreal Steak Seasoning (All Amazon links). Experiment with seasonings – go bold! Just do so a little at a time, because you can always add more, you can’t add less.
  4. Use herbs often and use herbs generously. I love growing my own herbs – even though there is a Battle Royale between me and raccoons – and they’re winning. Good thing they’re so darn cute! Rosemary, chives, parsley, and cilantro are my favorites but Basil and Oregano are fast-becoming members of the “in crowd.” Add parsley to scrambled eggs, cilantro to any and all Mexican-inspired dishes, rosemary to soups, and chives to everything else. Well, almost. Chives snipped onto fresh from the oven baked potatoes make all the cares of the world slip away.
Courtesy of: Quid Corner


Filed Under: Cooking 101: How to Cook!, Cooking Tips, Foodie Infographics Tagged With: cooking infographic, cooking tips, foodie infographic, how to cook

Avoiding Burns and Accidnets in the Kitchen: A Picture is Worth 1,000 Words

November 10, 2016 By Joi Sigers

Kitchen Accident Tracker
Something One of My Daughters (Brittany) Made for Me the Next Day!
This time of year is blissfully (yet crazy) busy for all of us, especially those of us who are also food bloggers. So many gift ideas to share, reviews to post, and recipes to pass along! However, some things are more important…. yes, even more important than stuffing recipes.

*Gasp!

A little over a week ago, I didn’t just burn my hand – I burned it good and proper.

Burned Hand from Bacon Grease
The photo above is from two days later. The nurse at the Urgent Care told me my hand would swell up, so I might want to remove my wedding ring ahead of time. I’m so thankful for this advice, because he was right, it completely ballooned up. This picture is after some of the swelling had gone down – the day before, I could see zero knuckle definition. I was very glad I had moved my wedding ring to my pinkie, otherwise it would have been a nightmare.

My Confession:

On the night in question, I was making bacon cheeseburgers in my iron skillet. After frying the bacon and sautéing my onions, I actually had too much bacon grease in my skillet. I knew I’d be making beans the next day, so my intent was to carry the iron skillet (those things are heavy, you know?) to the sink and pour the majority of the grease into a grease-holding container.

On the way from Point A to Point B, my mind kind of wandered….

Why didn’t I make smashed potatoes to go with these?.. I had crinkled fries the last time I made bacon cheeseburgers…  But they’re so good… MAN, is this skillet heavy… it makes my bad shoulder hurt like the dickens to carry….

Then it happened. Just as I was attempting to pour the HOT bacon grease into the container, somehow my arm gave way and I poured it all over the front of my left hand. Instinctively, I carefully sat the skillet into the sink and ran cool water over my hand like Niagara Falls.

I couldn’t, in that moment, remember exactly what would be best for such a burn, so I called out to my youngest daughter, “Would you please Google what you should do when you burn your hand with hot bacon grease??”

I’ll never forget her, “Uh oh! Okay…” Within 15 seconds she came into the kitchen with the answers.

When my husband got home from work, he took one look and off to the doctor we went. I’m not going to lie here, this was one of the most painful experiences I have ever had – and this from a lifelong klutz. The burning pain was excruciating and it did not let up for days.  I’m not bragging, mind you, or even seeking sympathy (although that is always a comfort). I’m not telling you all of this or sharing these pictures to gross you out, I’m only trying to catch your attention because I wouldn’t want this to happen to anyone. Please remind all the cooks in your life of the dangers that lurk.

Sometimes danger lurks the most in the “everyday” and “common” routines. I’ve cooked every single day for too many years to count.  The kitchen is my domain and cooking is my obsession. I think part of the reason I slipped out of the moment is because I’m so familiar with the moment.

Big mistake. I realized this, like, 20 times between the moment it happened and our arrival at the urgent care center.

Side note: When you make RNs and doctors grimace, you know you’ve done something righteous.

Burned Hand from Bacon Grease
My Lessons:

  • I made several glaring mistakes on “Bacon Grease Night” but there is one thing I have always gotten right. Since I first began cooking (at the age of 19… never you mind how long ago that was) I have always known and adhered to the law of keeping small children and animals out of the cooking arena.  Even before heading toward the sink with my iron skillet of hot doom, I glanced around to make sure my cat Alexa had not wandered into the area. Always know where your children are when you’re cooking – whether they wear fur or skin.
  • One other thing I did right, in the way of prevention, was this: I always keep a bottle of Aloe Vera Gel in the refrigerator. It was something I found myself extremely grateful for that night.
  • Always know what you should and should not do in the case of any type of emergency – whether it’s a burn or cut. I did not. With a burn, you should apply cool water, but not ice or ice water. Also, aloe vera gel helps the burn to stop making you feel like you are on fire. Apparently, keeping my hand in cool water and following it up with cold aloe vera gel kept my burn from being even worse.
  • Always have a stocked (with up to date ointments) first aid kit on hand. There should be Neosporin, band-aids, sterile pads, gauze, and first aid tape – just to name a few.
  • If you have a significant burn, go to an Urgent Care or even the ER. They have what I came to refer to as “unicorn salve” because it was so magical. It’s called Silvadene Cream, but I’m sticking with unicorn salve. They can also tell you how to prevent infection and wrap it for you.
  • You won’t want to leave your bowl of cool water or your life-saving sink, but GO.
  • Last, but possibly most important of all – stay in the moment. Stay in the here and now and be AWARE. Since the burn happened, each move I make in the kitchen has been accompanied with the thoughts of what could happen. This isn’t making me a worry wart, it’s just making me more AWARE, and when you’re in the presence of things that could do you a great deal of harm, being AWARE is the only state to be in.

We’ll be returning to reviews, recipes, and gift ideas in just a few minutes, but I hope you’ll keep all of these things in mind – I don’t want you to experience what I’ve been through and am continuing to go through.  Even now, over a week later, there’s still pain. The last blister to pop (when it did, if felt like it was crying acid…  wow did it burn) just peeled and exposed the most tender pink skin imaginable. It actually feels like a fresh burn, so there’s that.

Handle everything carefully, stay in the moment, and take extra precaution with hot grease and pans. Also, it’s worth repeating (because accidents in the kitchen can be fatal to them), keep pets and small children out of the way at all times.  When I think of what that spilled hot bacon grease would have done to a child or pet, I can’t even stand my own thoughts.

One final word: The image a the top was made for me the day after my accident by one of my daughters, Brittany. She and my other daughters (Stephany and Emily) were very sweet to me after my accident, as I would expect from them. I got so lucky when I had the three most perfect daughters in the world! I love that Brittany made this for me – it still hangs in my kitchen because it reminds me of how it made me laugh when she handed it to me!

You just never know how much thoughtfulness will mean to someone. I also love that she (and one of my sons-in-law, Rusty) insisted on being the ones to always help me change my dressings. Some sights and tasks are too much for some people to stand but their thoughtfulness and helpfulness meant a lot.

Family is everything to me and my group of heroes and heroines never, ever lets me down.

Burned Hand from Bacon Grease

Five Days Later – There Was Still So Much Pain – STAY AWARE!


Filed Under: Cooking 101: How to Cook!, Cooking Tips, Table Talk Tagged With: keeping kids safe in the kitchen, keeping pets safe in the kitchen, preventing burns, preventing kitchen accidents

12 Classic Sauces and How to Make Them (Infographic)

September 6, 2016 By Joi Sigers

Below is a beautiful infographic all about a favorite culinary subject… sauces! A great sauce can take a good meal and make it great or a great one and make it legendary. Enjoy! – Joi


Courtesy of: Quid Corner


Filed Under: Cooking 101: How to Cook! Tagged With: cooking infographic, food infographic, sauces

Be a Better Cook Tip: Have “Focus Foods” Throughout the Year

January 9, 2016 By Joi Sigers

Grilled Cheeseburger Pizza

Grilled Cheeseburger Pizza

Apologies to the wonderful and legendary phrase, “Practice makes perfect,” but I have a similar phrase that I’m pretty fond of. While my phrase is only a legend in its own mind, “Focus makes perfect” will serve you well in or out of the kitchen.

Five years ago, I came up with a new type of New Year’s Resolution – a culinary one, if you will.   Each New Year’s Eve, I’d sit down and make a short list of foods or ingredients that I wanted to experiment with, learn about, and try to “perfect” in as many recipes and meals as possible.

Over the years, the following foods and ingredients have had the spotlight….

  • eggs
  • chili
  • potatoes
  • homemade bread
  • peppers
  • soup
  • salad
  • onion rings
  • omelets
  • bacon
  • pizza
  • grits
  • sweet potatoes
  • squash
  • pies
  • cookies
  • pasta
  • kale
  • meatloaf
  • fish
  • cheese

Last year, my focus foods/ingredients were salads, cheese, hamburgers, gluten free pies, and grits. I researched cheeses to the ends of the earth and back again and made a wonderful new friend that I don’t know how I ever lived without, Gouda. In experimenting with recipes for grits, I found that this Gouda character brought out the best in grits and they’ve been happy ever since.

Like all great couples, they bring out the best in one another. Awww…

I also tried different approaches with hamburgers over the past year and have determined that:

  1. Like most things, an Iron Skillet (capitalized out of respect) makes magic happen with burgers.
  2. A sprinkle of garlic powder along with the salt and pepper is also highly recommended.
  3. Sauteing onions with a lot of black pepper, removing the onions, then frying your hamburgers where the onions just hung out is amazing.
  4. A hamburger wrapped in a big leaf of Romaine or Leaf lettuce actually beats bread, in my opinion. You taste the burger more this way.

This year, my focus foods are a mix of “oldies” that have to be re-done (more on that in a minute) and a few new obsessions.

Since my body decided a few years back that gluten/wheat were poison (it’s melodramatic, that way), I have to now go back to a few foods I’d perfected with wheat flour and re-perfect them with gluten free flour blends. Talk about a challenge.

Gluten free flours have their own temperaments and everything I learned before has to be un-learned in order to learn a whole new approach to baking.  I’m not complaining, mind you. In the grand scheme of things, this is a tiny blip on the radar. Besides, I love a good challenge. Keeps me on my toes.

So, on my tiptoes, I’m going to revisit and refocus on…

  • doughnuts
  • cornbread
  • bread
  • pizza and strombolis
  • meatloaf

I’ve also added the following new obsessions to the mix…

  • salmon (I have suddenly become ALL about the taste of salmon)
  • sushi (the recent discovery of gluten free imitation crab meat has opened a whole new world)
  • sauces, dressings, and dips – the more of my own sauces and dressings I make, the more I vow never to buy pre-made again.
  • lemon, limes, oranges – I want to experiment with as many recipes calling for citrus juice and peel as possible. The flavor is so bright and vibrant, I’m excited to see where it takes me.

Finally, a few recurring favorites (old standbys) will also be focus foods because they’re like family…

  • eggs (if you love eggs, too, you’ll want to check out my next post – some very brilliant minds have made poached eggs as easy as frying an egg)
  • cheese
  • candy (fudge is a lifeline)
  • catfish

If you’re like me, you’ll enjoy some of your focus foods so much that you’ll carry them right over into the following year… and maybe the year after that. That’s my relationship with kale, soups, and salads. It seems that each year – whether I even write the words on my focus list or not, I find myself consistently looking for more ways to jazz up salads and soups and more ways to sneak kale into them and everything else for that matter.

You may look at my list and wonder, “Why so many?!”  Well, there are several reasons. First of all, having quite a few will prevent you from burning yourself or your family out on the same foods over and over again. Second of all, the more the merrier – it keeps things fun. I like fun.

Before we get much further into January, think of some foods that intrigue you – whether they’re new to you or even foods you’re already familiar with.

Remember, focus makes perfect – and perfect tastes darn good.

 Lemons

Filed Under: Cooking 101: How to Cook!, Cooking Tips Tagged With: cooking 101, cooking tips, how to be a better cook

Primary Sidebar

Welcome to the Get Cooking Food Blog

My name is Joi (“Joy”) and Get Cooking is where I celebrate some of my greatest passions: Recipes, kitchen gadgets, gluten free food reviews, gluten free recipes, pig collectibles, chocolate, cookbooks, and coffee.

Lots of coffee…

  • Email
  • Instagram
  • Twitter

What’s New on the Food Blog?

  • Brilliant Organizer for Cans and Other Pantry Items… Even Dishes
  • Disposable Air Fryer Liners: Perfect for Fast Cleanups!
  • Vegan and Gluten-Free Salad Dressings, Mayo & Butter from Plant Perfect (Exciting New Products!)
  • Goodful Non-Stick All-In-One Pot: It Has all the Good and None of the Bad (Seriously, I Love This One!)
  • Torani Strawberry Flavored Syrup Makes VERY Memorable Tea, Matcha, Milkshakes, Smoothies…
  • Gorgeous Purple Dutch Oven… My Ideal Soup Pan!
  • As Simple as it Gets Japanese Broth Soup (The Possibilities are Endless)
  • Healthy and Delicious New Favorite Snack

Gluten-Free Recipes

Wedge Salad with Roasted Tomatoes, Bacon, Chia Seeds, Sauteed Onions, and Ranch Dressing

Wedge Salad, Starring Roasted Tomatoes

CauliPower Linguine Pasta with Meat Sauce

Caulipower: Quite Possibly THE Best Gluten-Free Pasta

A Wonderful Gluten-Free and Vegetarian Cookbook: Whole Bowls by Allison Day

Gluten-Free Lasagna with Explore Cuisine Green Lentil Lasagna Noodles

Easy Gluten-Free Lasagna with Explore Cuisine Green Lentil (No Boil!) Noodles

Tostadas with Refried Beans and Tomatoes

Fast & Easy Summer Meal: Meatless Tostadas

Gluten-Free White Chocolate and Pecan Cookies

Gluten Free Cranberry Pecan Cookies

Air Fryer and Rotisserie in One!

Instant Vortex Plus 10 Quart Air Fryer, Rotisserie and Convection Oven (Amazon link)

A Reminder for all Cooks…

Kitchen Accident Tracker

If my accident can prevent you, a pet, or a child from being hurt, it will have been worth it to me… read more here!

Footer

T-fal… As Good as Good Gets

The T-Fal Cookware Set (Amazon link), above, is absolutely one of the best cooking sets you’ll ever find. It’s on Amazon and available in several gorgeous colors.

Subscribe to Get Cooking

Fill in the form below to receive updates through e-mail whenever something new has been added to the food blog.


Powered by FeedBlitz

  • Email
  • Instagram
  • Twitter

Contact me through e-mail at joitsigers@gmail.com and/or connect with me through social media (see above). ~ Joi (“Joy”)

I do not claim to have taken all of the photographs on this website. I did not take any of the “product” or “affiliate” merchandise photos, nor do I claim to own them. If you are a photographer that sees something you want removed, simply e-mail me!

Copyright © 2022 Get Cooking Food Blog   xml sitemap   Privacy Policy   Crazy Tea Chick!