Credit: https://ebodysupplements.co.uk
Low FODMAP Recipes, Restricted Diets, Cookbook Reviews, Gluten Free Recipes...
Credit: https://ebodysupplements.co.uk

Over the years, I’ve been blessed to receive a lot of wonderful food, drinks, cookbooks, pans, and kitchen gadgets to review on Get Cooking. I was recently sent a Fair-Trade Coffee Gift Set from the One Cup Project (a beautiful organization that works with World Vision) and it had an immediate effect on me. In fact, the effect hasn’t left and I don’t believe it ever will.
First a little bit about World Vision. This charitable organization (no doubt you’ve heard of them) doesn’t just “want’ to help save the world, they’re rolling up their sleeves and having at it. And by save the world, I mean save as many people as possible from hunger, thirst, illness, repression, and from a lack of everyday needs – the sort of needs that you and I take for granted.
Years ago, World Vision set up something extra wonderful – the World Vision Gift Catalog. Since it began in 1996, the World Vision Gift Catalog has grown in popularity as a gift-giving alternative; more than 844,000 people helped someone through the Catalog in the last year alone.
My much loved and much treasured Fair-Trade Coffee Set from the One Cup Project is just one of the gifts available in the gift catalog.
Before I tell you why the Coffee Set is an incredible option and why holding the handmade items brought tears to my eyes, let me tell you a little bit about how the gift catalog works – and how, by buying something extra-special for someone you love, you can touch the life of someone you’ve never met.
Better still, I’ll let World Vision tell you, themselves, with the wonderful video below:

When I received the One Cup Fair Trade Coffee Set on my doorstep, I was as excited as a 6 year old on Christmas morning. Knowing the story BEHIND One World Vision’s mission, the importance of the Gift Catalog, and the fact that the set would include a handmade wooden scoop and hand-sewn bag (made from African fabric) crafted by beautiful people a world away left me with a lump in my throat.
As a writer, I work with words every single day of the year, except for Sundays. Yet, right now I’m at a complete loss for just the right words to describe how it felt to hold this beautiful wooden scoop and colorful, beautiful fabric bag in my hands. I can’t describe the feeling but, know this, I’ll never forget the feeling.
As tears came to my eyes, it just reawakened a love for all of God’s people – near and far. It also served as an alarm to awaken something inside of me that had been napping – there are men, women, boys, and girls all over the world who not only have the luxuries you and I take for granted – they don’t have food, shoes, or even clean drinking water.
You know the “survival” shows we watch on television – for our entertainment? There are precious people out there who’d look at these shows as though they were “just another day.” In fact, they might even think that these popular “survivors” are kind of soft.
Our entertainment. Their reality. How is this even possible?
I hope I’m not depressing you. That isn’t my intention. I just wanted to sound an alarm loud enough for as many people to hear as possible. THEN… in turn… I hope you set off you own alarms.
If you’re like most people, you’re thinking, “But, what can I do.. I’m just one person?” World Vision and One Cup are making it SIMPLE, EASY, PAINLESS, and DELICIOUS for each one of us to do our part. Simply by doing what we routinely do…. buy coffee!
Now, let me tell you about this wonderful coffee.
I actually put off opening and brewing the coffee for a couple of days. Why? I’m not 100 percent certain, but I think it had something to do with emotions and expectations. I was so EXCITED about One Cup’s mission that I was afraid the coffee wouldn’t live up to the moment.
I mean… how could it, right?!?!
I think part of me wondered, “What will I say if… after all the heart strings have been maxed out… the coffee is average, bland, or even… Heaven forbid.. bad?”
I reasoned that, if one of these things happened, I’d just keep it to myself and focus 110 percent on the mission, the beautiful fabric bag, and the adorable wooden scoop (I do love that bag and scoop!). I guess there’s safety in numbers, because the first time we opened and enjoyed the coffee in our home was when one of our best friends was visiting. He, like my husband and myself, is a huge coffee lover. It seemed like the right time to try out exciting new coffee with three complete coffee addicts in the same kitchen.
As the coffee beans were grinding and then brewing, the gorgeous, glorious aroma filled the room. There’s nothing quite like the aroma of great coffee, is there?!
Then the moment came. We poured our cups of coffee and prepared for our test drive. The room became completely quiet and, not surprisingly… not even remotely surprising… I was the first to speak. I’m not sure how they were arranged, but I know my first words (aloud) were, “Exotic, wonderful, bold, and fantastic.” The words I whispered to myself were, “Thank, God!”

I say all of that to say this – we know average coffee, good coffee, great coffee, and exceptional coffee. It is my privilege to tell you that this particular coffee qualifies as exceptional. As a coffee pro, I suspected it’d be special when I opened the bag.
The smell gave it away – I knew it was special.
In fact, if we’re being honest – this coffee creates its own category. A category that reaches BEYOND exceptional because it is included in a set that makes a difference…. a VERY REAL difference… in people’s lives. It allows US to reach out and lovingly give a hand to others while offering them hope.
The most important part of this entire project is, obviously, the difference it makes in people’s lives. How can you even put a price on giving people hope?! However, you’ll benefit on a personal level as well – after all, aren’t we coffee lovers always on the lookout for exciting new coffees to try? What’s more… trust me on this one… you will cherish the handmade items. When I held mine, I knew that…
Please click through and read more about the beautiful One Up Project. You will be touched by their mission and the coffee lover in you will be excited by the number of fantastic coffees they have available. I hope you’ll pick out a few bags to order today! For every $11 bag of coffee you buy, $11 goes to fund living aid in Africa.
I also hope you’ll read more about the World Vision Gift Catalog.
Below are just a FEW of the wonderful gifts in the catalog. There are a LOT more – including a gorgeous scarf I have my eye on.. both eyes, in fact!
Be sure to connect with World Vision on their Facebook page at/WorldVision and on Twitter at @WorldVisionNews. You can connect with One Cup Project on Twitter at @OneCupProject. Can you imagine all the lives that could be touched and saved if we ALL roll up our sleeves and did our part?


If you love meat and potatoes, let me introduce you to your next favorite cookbook: Meat and Potatoes: Simple Recipes that Sizzle and Sear by Rahm Fama with Beth Dooley is filled with recipes you’ll use (and love) year-round..
Recipes that are actually doable – with ingredients that are simple and easy to find. Heck, you’ll probably have a lot of the ingredients on hand before you even go to the store.
My grocery budget loves it when that happens.
An example is the recipe for”Parsley New Potatoes.” The ingredients called for are small red new potatoes, salt, parsley, olive oil, and pepper. The gorgeous “5-B Burger” is another great example of a recipe with easy to find ingredients: Lean ground chuck, ground black pepper, bacon, bacon fat 0r olive oil, blue cheese, unsalted butter, fresh basil, and soft burger buns.
One more: Asparagus with Mint Hollandaise: Asparagus, eggs, lime juice, unsalted butter, Tobasco Sauce, chopped fresh mint.
Why the extra focus on recipes with easy to find ingredients?
So… that’s why I’m shining such a bright spotlight on these particular recipes in this particular cookbook. They’re outstanding recipes that can be created within a grocery budget – with recipes you can actually find without driving to a nearby city or turning to Amazon.
From the Back Cover:
Armed with a cast-iron skillet and the best ingredients he can find, meat-loving chef Rahm Fama serves up a fresh take on chuck wagon cuisine for flavorful meals you can enjoy no matter where you are.
Inspired by his early years on a Southwest cattle ranch, he followed his carnivorous curiosity across the country, seeking the choicest cuts and best ways to cook them. There’s nothing like the thrill of throwing a pat of butter in a hot pan and searing a perfect steak, or grilling a pork chop, or braising chicken. Meat and Potatoes presents 52 irresistible and simple meals—one for every week:
• Pepper-Crusted New York Strip Steak, Hand-Cut Fries & Wilted Mustard Greens
• Pan-Seared Pork Tenderloins, Granny Smith Apple Mashed Potatoes & Roasted Fennel Ragu
• Turkey Kabobs, Tzatziki Couscous Salad & Eggplant Caviar
• Lamb Medallions, Sweet Potato Galette & Crusty Fried Green Tomatoes
Here, too, are one-pot recipes, including Shepherd’s Pie Cupcakes and Paella with Pepper Bacon, plus ideas for sandwiches to make with leftover meat. Meals that take less than an hour are highlighted throughout for fast, delicious weeknight options. Rahm’s knowledge about meat and rustic recipes from the range will help you upgrade your dishes, no matter who rides into town. – From the back cover of Meat and Potatoes: Simple Recipes that Sizzle and Sear.
In addition to 52 extraordinary recipes, Meat and Potatoes has A LOT of advice for cooking the best meat possible. There are different sections for Beef, Pork, Chicken & Turkey, Lamb, and Game. Not only will you find PERFECT recipes for each of these meats, you’ll find information on selecting different cuts of meat, what to look for, and general “rules.”
The information, along with the recipes and tips will have you making “restaurant quality” meat at home. Actually, if we’re being honest here, you can make better than “restaurant quality” because this book gives you all the tools you need to cook like a pro.
While this is the IDEAL cookbook for meat lovers, don’t think for a minute that it’s ALL meat. There are a ton of great sides as well. In fact, you just may find yourself as excited about the sides as you are the meat dishes. Smoked Paprika Parsnip Fries, Wilted Mustard Greens, Creamy Corn-Blue Cheese Polenta, Caramelized Cipollini Onions (uses pearl onions, butter, rosemary, chicken stock… See? Simple ingredients… Sensational results!), and Roasted Artichoke Hearts are just a few.
Something I’m going to begin adding to my cookbook reviews is a section called SINK (Specific Individual Needs in the Kitchen). Whether it’s food allergies or intolerances (gluten, wheat, dairy), food preferences (vegetarian), cooking on a budget, beginner’s recipes, or fast and easy recipes – we all have individual needs when it comes to cooking. As someone who recently had to begin eating gluten free (health reasons… I didn’t suddenly fall in hate with doughnuts, pizza, and onion rings), I now realize that buying cookbooks (and even magazines) is something you approach with extra caution… “Will there be enough recipes I can even make and enjoy?!”
Vegans, Vegetarians – I’m sure you don’t need me to tell you that a book titled “Meat & Potatoes” might not be for your! But, here’s the thing: Vegetarians need variety as much as the rest of us. One of my three daughters (Brittany) is a vegetarian and she gets WAY excited when I cook up something snazzy for her. Same-O, Same-O can get old. There are some amazing vegetable recipes in Meat and Potatoes – so many, in fact, that I have a unique approach for you. Buy Meat and Potatoes: Simple Recipes that Sizzle and Sear for someone in your family (you know, one of those “meat lovers”), then borrow the book for the recipes you can enjoy!
My Fellow Gluten Intolerant Buddies – This was all but made for us! While (like most cookbooks), “Meat and Potatoes” doesn’t include “gluten free” alongside any of the recipes, common sense can be your guide. If you have to eat gluten free, you already know that you have to check your individual ingredients (chicken broth, BBQ sauce, cream soups, mayonnaise, beef broth, seasoning packets, soy sauce, Worcestershire sauce, etc,).
When I had to start eating gluten free, I found that I had a whole new relationship with recipes. Suddenly I had to start reading a recipe, addressing the “question marks” along the way. Some “question marks” would pop up when I’d have to ask whether an ingredient was gluten free or not. Other “question marks” would pop up when I’d have to figure out if I could find a “gluten free” version of an ingredient. “The recipes in Meat and Potatoes: Simple Recipes that Sizzle and Sear produced the fewest “question marks” I’ve encountered in a long time.
Obviously, when it comes to Worcestershire Sauce, stock, soy sauce, and similar ingredients – you have to find one that says it’s gluten free. But, if you’re like me, you automatically think of your go to brand when you read these ingredients. For example, when I read “soy sauce,” I automatically think “Tamari.” When I see Worcestershire Sauce, my brain says, “Lea & Perrins.”
Beginning Cooks and Cooks Who Want Things as Easy as Possible – This is your cookbook! Seriously, I wish (years and years and years ago) when I’d started cooking, I’d had such a simple and precise guide to cooking steaks, chicken, pork chops, burgers, etc. And as far as quick and easy goes, how does this particular recipe sound – “Rotisserie Chicken Noodle Soup.” Simply begin with a Deli Rotisserie Chicken and you’re over halfway there.
Meat and Potatoes: Simple Recipes that Sizzle and Sear is a cookbook you will absolutely love. It would also make a wonderful gift idea for the foodies in your life. Packaged with a wonderful new iron skillet (like the Lodge Pre-Seasoned Cast-Iron Chef’s Skillet)… perfection!


I never knew President even made butter. Of course, I’m well aware of (and a huge fan of) their cheeses – AMAZING in their own right. In fact I just recently bought a President Brie Cheese that I’m fascinated with.
But back to their butter. Their delicious butter, that is. (Warning, this review includes tons of pictures, so be sure to continue reading after each picture.)
I was sent the following President butters to review:

I’m almost as obsessed with sea salt as I am butter, so naturally the first one I tore into was the President Sea Salt Butter.
When you open the little dome-shaped container, you find that the butter is wrapped beautifully in gold paper. So very classy. So very French.

The first thing I noticed about the Sea Salt Butter was its great looks. Truth be told, she’s a beauty. The streaks of darker yellow running throughout the paler yellow was striking. I thought then, “This butter would be GORGEOUS on a Thanksgiving or Christmas table!”
I’m not ashamed to admit that the first thing I tried the President Sea Salt Butter on was my finger. I sliced off a chunk and into the mouth it went.
My first thoughts:
Beautiful and delicious – how does it get any better?
As for the taste of salt, it was subtle – just as it should be. Detectable? Yes. Over-powering? Not in the least.
The first non-body-part thing I ate with the Sea Salt was Steamed Rice and it was spectacular. Since I knew I’d be using Sea Salt Butter, I simply didn’t salt the rice after taking it out of the steamer.

The President Sea Salt Butter is out of this world – not only on rice but pasta too. I’m certain it’d be delicious on anything.
Including fingers.

Off the charts delicious!
When my husband and I were eating supper, he said, “These are the best sweet potatoes I’ve ever had. What did you put in them?”
Funny thing is, I made them just like I always do – the ONLY difference was this time I used President Butter instead of one of the ones I normally use.
I thought it was a great testament to the butter that he noticed without me saying anything. I knew I had noticed how much better they were this time, but I was afraid I was just being partial to my new found butter obsession. He had no idea the butter was new… so he’s an even better judge than me.

The majority of people seem to want their butter to be quite yellow. Again, I know I’m in the minority here, but I prefer my butter to be paler. If it’s terribly yellow, it just screams “MARGARINE!” to me. But when it pale, it purrs, “Creamy butter…” – with an emphasis on cream.
President butters are incredibly creamy and more delicious than is seemly. It just isn’t right for anything to be this good.
Okay, so where can you find President butter? I’ve found a few on Amazon (if I didn’t already love Amazon, I would now):
You can also visit President Cheese‘s website and search for stores near you. You can also read more information about President butter and cheeses on their beautiful website.
I’m watching my local grocery stores in the hopes that President Butter will soon be available. This is exceptional butter and… take it from me… once you’ve tasted it, everything else seems like a distant second.
I HIGHLY recommend getting your hands on some President Butter right away – as in the sooner, the better but whatever you do, make sure you have plenty for the holidays. My mind is buzzing at the thought of President Butter on corn on the cob, mashed potatoes, and rolls – to say nothing of the extra creamy goodness it’ll bring to homemade fudge, butter cookies (I think I’m beginning to drool…), casseroles, dressing…


Bacon. Cream Cheese. Jalapenos. Enough said, right?
These oven-baked little beauties are as delicious as they are easy to make. They’re also easy on the budget – something else we’re all looking for these days.
14 jalapeno peppers
4 ounces cream cheese, softened
7 bacon strips
berry sauce or ranch dressing (optional)
First of all, be careful when working with jalapeno peppers. If you want to be entirely safe, use disposable gloves. Handling the inside of a jalapeno can burn your skin – and if you transfer the oils to your eyes…. AGONY! Take extra precautions and don’t touch your face, whatever you do.
Can you tell that this gal has been there, done that?
For Bacon-Wrapped/Cream Cheese-Stuffed Jalapenos
Serve either by themselves or with a little dish of ranch dressing. The bacon wrapped jalapenos drizzled with Ranch dressing are extra pretty and taste fantastic. The ranch helps tone down the heat of these little guys.
Vegetarian Alternative? Just skip the part about wrapping the peppers in pork shawls. Place them in the oven, as is. Either serve plain or use a simplistic berry sauce like the one described below the picture.
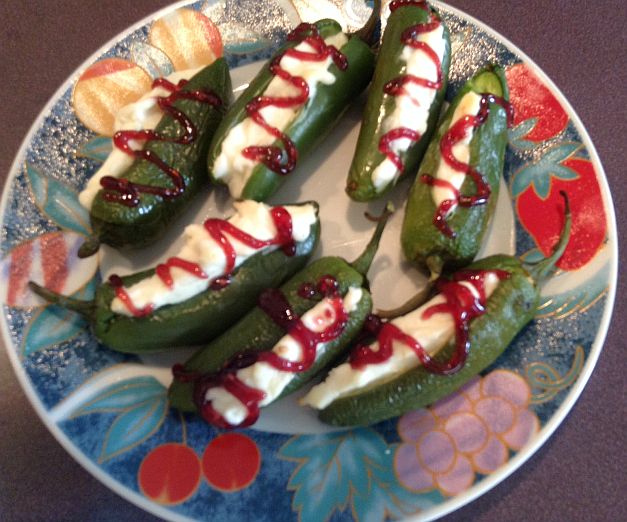
For the vegetarian (or baconless) version, I like to make a really simple little “Berry Sauce.” For the peppers shown here, I heated 4 TBS Red Pepper Jelly and 1 TBS Raspberry Preserves until I achieved the consistency I needed for drizzling. You can combine basically whatever fruit preserves you have on hand with red pepper jelly – I just prefer the sweetness of raspberry preserves. Drizzled across the top, it makes an already impressive and pretty dish even more so.
This method creates a sauce that will thicken FAST, so drizzle asap. If it begins to get too thick to drizzle.. which it will… sit your bottle in a cup of hot water.

If you’re feeling adventurous, here’s a Copycat Recipe for Arby’s Bronco Berry Sauce from Top Secret Recipes!
Don’t get me wrong…. I’ve always loved sweet potatoes. Whether they come to the table baked, wearing butter and brown sugar or they choose to present themselves to me in the form of a pie… I’ve always been a fan.
However, for reasons I can’t even begin to explain, since I had to start eating completely gluten free, they’re one of my biggest cravings. I, literally, can’t get enough potatoes (white or sweet) these days. It’s as though my body says, “Fine. I can’t have this, this, and this… but I can have potatoes! Bwahahaha!”
Crazy body.
At least sweet potatoes are healthy. Just a 1-cup serving gives us 65% of our daily requirement for vitamin C and and as much as 700% of the recommended daily requirement for vitamin A. I am so juiced up with vitamin A, I can’t even tell you.
If you keep up with glycemic indexes of foods (I do not), sweet potatoes have a modest glycemic index of 17.
I’ve found the best restaurants for ordering sweet potatoes (Rafferty’s and Bob Evans have HUGE, delicious sweet potatoes – Cracker Barrel’s are darn good but, to be perfectly honest, they’ve shrunk to the size of new potatoes) – but, making them at home means I can have them anytime I want. Plus, I know they won’t be the size of a golfball.
Yeah, CB, size matters.
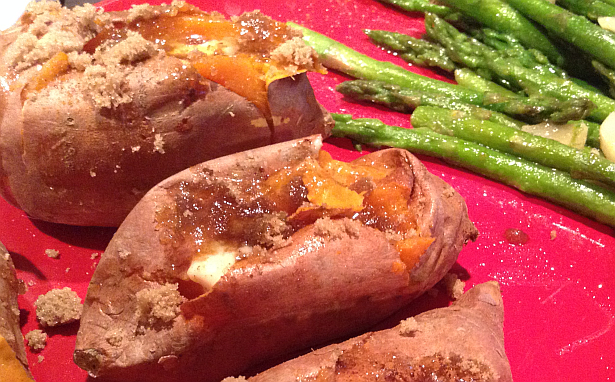
When making sweet potatoes in the oven, here’s a golden trick I’ve lived by for years – make more than you’ll need! After they’ve cooled off (in the foil), remove the sweet potato and place it in a container or even a plastic bag and place in the refrigerator. Within the next few days, warm one (or more) in the microwave, add butter and brown sugar and let the party begin.
As for the temperature, sweet potatoes are incredibly flexible. If you’re cooking a casserole or meat dish that requires an oven temp different than 400 degrees, no problem. Simply place your sweet potatoes in the oven along with the other food.
To show you how “flexible” a sweet potato is, you’d be hard-pressed to find three “How to Bake Sweet Potatoes” recipes with the same oven temperatures OR times! Over the years of cooking MANY sweet potatoes, I’ve settled on 400 degrees as my favorite – however, that certainly doesn’t mean it’s the only way to do it.
Use the temperature you need to use – simply check on the potatoes often.. without burning yourself, please.
After cutting my cooked sweet potato open, I add butter (real butter – it makes a world of difference) and as it’s melting down into the potato, I add brown sugar and a couple of dashes of cinnamon. You can start with 1-2 TBS brown sugar and 1/4 tsp Cinnamon as your guide, adding more or less – depending on your own personal taste.
It makes for a vegetable that tastes more delicious than any vegetable has a right to taste.
Shhhh, high-falutin’ cooks wouldn’t want this getting out, but sweet potatoes can be cooked in microwave. Simply pierce the sweet potato and nuke for 10 minutes. Check for doneness (I love that word.. even if my spell check is convinced it isn’t a word... it is in my world, spell check, it is in my world). As with baking sweet potatoes in the oven, your time will depend upon the size of your potatoes. Keep adding minutes – a couple at a time – as needed.
Sweet Potato Cookbooks:
See Sweet Potato Cookbooks if you’re unable to view the slideshow above on your device.


Before you zero in on the words “strong-smelling” or “underground fungus,” you should know that truffles are considered to be culinary delicacies. The flavor and aroma are uniquely their own and once you fall under their spell, your fate’s sealed. They also have this cool distinction: Truffles are often found (especially in France) with the aid of trained dogs or pigs.
Pigs!
One of the easiest (and funnest) ways to mix things up in your cooking – while making delicious new discoveries – is to try different ingredients. Truffle salt is one of my favorite ways to add a little originality and freshness to favorite dishes. I wouldn’t recommend substituting regular salt in recipes with truffle salt because of the uniqueness of the taste. Truffle salt is at its best when sprinkled on top of eggs, warm bread, baked potatoes, and fries (truffle fries… mmmmm-good).
My most recent truffle salt order (Amazon) was the adorable Truffle Salt 1.74 Oz, (Amazon link) pictured here. It’s very inexpensive and, trust me, adds a lot of fun to your kitchen. The novelty, alone, kicks things up – way up.

Black Truffle Sea Salt (Fascinating flavor!)
I hope you’ll try the Black Truffle Sea Salt soon – I think you’ll love it as much as I do. Be sure to start out easy, though. Truffle Salt is one of those things (think: garlic) that make you think the phrase “a little goes a long way” was coined just for it. Click through either image above or the link for more information.
More Truffle Delicacies on Amazon:

Roland Black Truffle Oil, 3.4-Ounce Bottle (above)


The Blender Girl: Super-Easy, Super-Healthy Meals, Snacks, Desserts, and Drinks–100 Gluten-Free, Vegan Recipes! (Amazon link) is currently the number 1 bestseller in blender recipes on Amazon and is receiving rave reviews.
Here comes another one!
As I’ve said 1,000,001 times, I collect cookbooks – they’re an obsession of mine. I don’t know where the fixation came from, but since my first cookbook (I was 16 at the time) to my most recent cookbook (never you mind about the age..), I treat each like any collector treats their individual prizes… like treasure. Someone once asked if I sell my cookbooks after I’ve reviewed or read them. I said… well, never you mind about that, too.
The Blender Girl is the most recent prized addition to my cookbook collection. It’s full of gluten free and healthy recipes and I can’t wait to try each one. Although the gorgeous author is on the cover drinking a smoothie, this cookbook is more than just smoothie recipes.
Don’t get me wrong, I’m ALL about smoothie recipes and the ones in this collection are fantastic – but I do love the fact that The Blender Girl (Amazon link) has a wide variety of recipes. Below are just a few:
If you’re committed to healthier eating, this honestly should be the next cookbook you buy. In addition to the wonderful recipes, you’ll learn the many benefits of eating a more wholesome diet. You’ll also learn all about soaking, sprouting, and dehydrating; proper food combining; and eating raw, probiotic-rich, and alkaline ingredients. Fortunately, it’s all in a very easy to understand format. You don’t need a dietitian’s degree or nutritionist’s experience.
You just need a blender!
This is a beautiful, very detailed, and reader-friendly cookbook that’ll help get you on your way to cleaner, healthier eating. See The Blender Girl: Super-Easy, Super-Healthy Meals, Snacks, Desserts, and Drinks–100 Gluten-Free, Vegan Recipes! (Amazon link) for more information. This book is also available on Kindle.
Note: I received this book from the Blogging for Books program in exchange for this review. The opinions are entirely my own.

They’re that delicious.
1 (16 oz) can refried beans
1 (4 oz) can chopped green chiles
1/4 tsp. garlic powder
1/4 tsp. ground cumin
1/4 tsp. chili powder
dash of Kosher salt
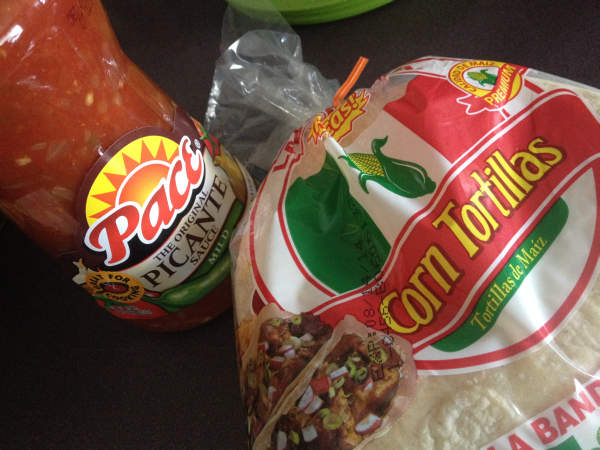
8 – 10 Corn Tortillas (I use white corn tortillas)
Pace Picante Sauce (or your favorite Salsa)
Shredded Cheddar Cheese
Your favorite toppings: green onions, sweet onions, jalapenos, diced green pepper, black olives…
You can make these pizzas in the oven OR on the stove, in a skillet. The latter’s pretty convenient in the summer months if you don’t want to heat up your kitchen. I’ve made these both ways and honestly don’t have a clear-cut favorite. I will say this, though, for whatever reasons, using a skillet seems to draw out more of the delicious corn flavor from the tortillas.
If you’re using an oven, preheat it to 400 degrees.
In a small bowl, combine the beans, chiles and spices. you could also throw in a little diced jalapeno if you’re brave enough.
Oven Method: Place tortillas on a large baking sheet. Spread with the bean mixture, to within 1/2 of the edges. Top with another tortilla, gently pressing down. Spoon Pace Picante Sauce or salsa over the top, then sprinkle with cheese and your favorite toppings. Bake at 400 for 10 – 15 minutes or until cheese is melted.
Stove Top: Toast tortillas (two at a time, side by side) in a skillet. Spread one of them with the bean mixture and top with second toasted tortilla. Spoon Picante Sauce or salsa over the top and sprinkle with cheese and your toppings. Put each pizza back on the skillet cover, and heat on low until cheese is melted.
Use a pizza cutter to cut each pizzas into fourths. Serve with a salad or tortilla chips and you have a quick, easy, budget-friendly, and delicious meal.
Picante Sauce or Salsa? Either is delicious – but I’m a sucker for Picante Sauce for the simple fact that it’s sweeter. I actually prefer to mix things up and alternate between Picante and salsa.
Toppings: Use however much or however little you want – you call the shots. My favorite toppings for these pizzas are black olives and green onions but feel free to use any type of pepper that catches your eye. Finely shredded lettuce, finely chopped tomatoes and a dollop of sour cream are also great additions after the pizzas have come out of the oven or off of the stove.