• Skip to primary navigation
  • Skip to main content
  • Skip to primary sidebar
  • Skip to footer

Get Cooking!

Recipes, Kitchen Gadgets, Cookbook Reviews, Gluten Free Recipes...

  • Home
    • Contact
    • About
    • Privacy Policy
    • Sitemap
    • Store
  • Reviews
    • Cookware Reviews
    • Food Reviews
      • Gluten Free Food Reviews
      • Health Food Reviews
    • Bakeware
    • Candy Reviews
    • Coffee Reviews
      • Aerobie AeroPress Coffee and Espresso Maker
      • Coffee Makers & Grinders
    • Cookbook Reviews
      • Cooking Magazines
    • Kitchen Gadgets
    • Small Kitchen Appliances
  • Gifts & Collectibles
    • Candy Bowls
    • Christmas Shopping
    • Coffee Mugs
    • Canister Sets
    • Cookie Cutters
    • Gifts for Coffee Lovers
    • Gifts for Tea Lovers
    • Owls in the Kitchen
    • Pig Collectors
  • Recipe Index
  • How to Be a Better Cook
    • Baked Sweet Potatoes in the Oven
    • Cooking Videos
    • Perfect Baked Potatoes in Your Oven
You are here: Home / Archives for Recipes / Appetizers

Appetizers

Caribbean Tuna Salad: A StarKist Recipe That’s as Delicious as it Looks

May 11, 2017 By Joi Sigers

StarKist Tuna and Avocado Recipe

If you don’t have avocados on hand, you can serve this delicious tuna salad in leaf bowls, in a hollowed-out tomato, on toast, or even in grooves of celery sticks. You could, of course, go old school and serve it on toast…. do you have any idea how delicious StarKist tuna salad on toast sounds right about now??

The recipe below is out of this world – since I’m deathly (literally, it seems) allergic to mangoes, I leave them out. I replace them with chopped green grapes. For whatever reasons, grapes and tuna fish make the perfect pair. Then again, as far as I know, mangoes and tuna fish do too – you’ll have to try and let me know!

Caribbean Tuna Salad in Avocados

2 (5 oz.) Cans – Solid White Albacore Tuna in Water, (or NEW Low Sodium Solid White Albacore Tuna) drained
21⁄2 Tbsp. light mayonnaise
2 tsp. chopped chipotle pepper in adobo sauce
1⁄4 cup chopped jicama
1 mango (1⁄2 diced for salad and 1⁄2 sliced for garnish)
4 avocados, halved
Cilantro and lime juice to taste
Leaf lettuce, if desired

In a medium bowl mix mayonnaise and chipotle pepper well. Add tuna, jicama and diced mango and mix well.
Cut avocados in half and remove seed. Hollow out slightly if needed.
Place tuna salad in avocado half and sprinkle with a little fresh lime juice and chopped cilantro. Place on lettuce-lined plate with mango slices as a garnish.

Also See: Simple and Spicy Tuna Tacos (Crazy Delicious!)

See more StarKist Tuna Recipes.


Filed Under: Appetizers, Cooking on a Budget, Salad Recipes, Tuna Fish Recipes Tagged With: Avocado recipes, tuna fish recipes, tuna fish salad recipe

The Veggie-Loving Cowboy’s Caviar (Recipe)

December 14, 2016 By Joi Sigers

The Veggie-Loving Cowboy's Caviar
You just gotta love irony, don’t you? Here I am, an avid cook/baker, and food blogger and one of my husband’s favorite things I make doesn’t even require a minute of cooking time.

Doesn’t even need a good nuking!

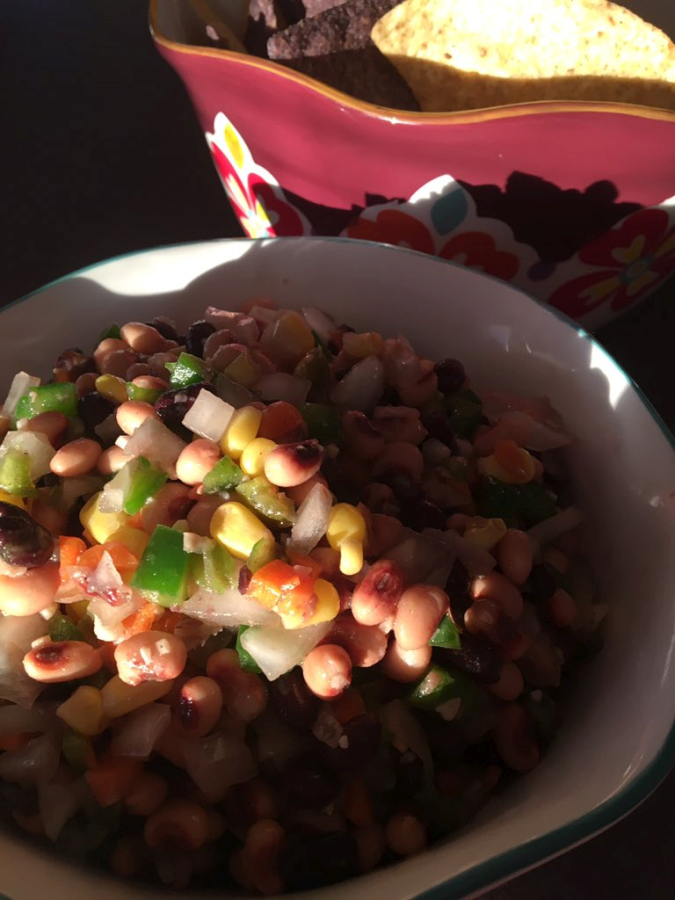
The boy loves Cowboy Caviar like it’s his job. I try to make some up as often as good common sense and reason dictate (in spite of the fact he’d eat it every week, left to his own devices).

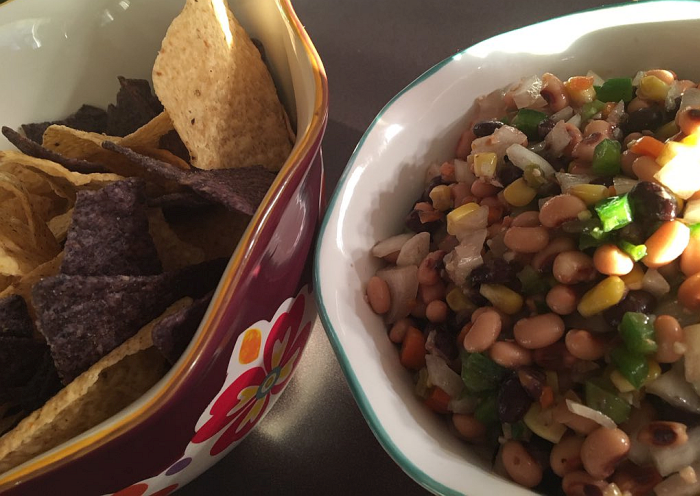
The cool thing about Cowboy Caviar is you can go all “free kitchen spirit” and throw in your own favorite flavors – as long as you stay reasonably close to the proportions and remember that everything does need to fit on a tortilla chip.

The recipe below is how I made this particular batch – I honestly don’t think I’ve made two ever exactly the same. If this is too much jalapenos for you, cut the amount. The same goes for the salt – if you’d like more, add more – if you want less, add less. Just go slowly with the salt because you don’t want to overpower all the flavors going on.

Cowboy Caviar is a favorite “go to” recipe for Summer lunches and suppers but it’s also IDEAL for busy times of the year, like the holidays and Christmas when we’re (quite honestly) too busy to even think about cooking!

As I’m serving Cowboy Caviar, I like to drizzle a little extra EVOO on top – makes it shiny and, what can I say, I’m crazy about the flavor.

The Veggie-Loving Cowboy’s Caviar

Print this recipe
Joi Sigers
December 14, 2016
by Joi Sigers
Category Appetizers Gluten Free Quick and Easy Recipes Summertime Favorites
The Veggie-Loving Cowboy's Caviar

Ingredients

  • 1 large green bell pepper
  • 1 large sweet onion
  • 2 cups frozen corn (thawed)
  • 3 cans black-eyed peas (drained)
  • 1 can black beans (drained and rinsed)
  • 2 Tbs diced jalapeno from a jar
  • 1 tsp of the juice from the jalapenos
  • 1 Tbs + 1 tsp minced garic
  • 1/2 Tbs Kosher salt
  • About 10 baby carrots shredded or diced
  • 2 celery stalks, finely diced
  • Pepper, as desired
  • Optional: 2 TBS chopped parsley or cilantro

Instructions

  1. Combine everything in a large bowl and stir well. That's it!

Tags

Cowboy Caviar recipe

Pictured: My beloved Pioneer Woman bowls my daughter Brittany gave me for my birthday. They’re two of a three part set that are just gorgeous. They’re available in most Wal-Marts, as well as online.  Click here to find where you can buy them online.

The Veggie-Loving Cowboy's Caviar

Filed Under: Appetizers, Gluten Free, Quick and Easy Recipes, Summertime Favorites Tagged With: Cowboy Caviar recipe

Balsamic-Drizzled Tomato, Mozzarella, and Basil “Salad”

July 21, 2016 By Joi Sigers

Rachael Ray Balsamic Drizzle

I’m over the foodie moon in love with Rachael Ray’s Balsamic Drizzle (Balsamic Reduction). It’s HEAVENLY on chicken but my favorite way to use it is shown here: a Balsamic-Drizzled Tomato, Mozzarella, and Basil Appetizer that is beautifully delicious (and deliciously beautiful) with pasta, pizza, or even on its own.  It even makes a delicious (and filling) lunch all by itself.

One of the coolest things about this appetizer/lunch is it needs no recipe. It’s kind of refreshing to break away from “exacts” every now and then, isn’t it?

For this Balsamic-Drizzled Tomato, Mozzarella, and Basil Appetizer, simply round up your ingredients:

Fresh Mozzarella

  • Basil Leaves (fresh, of course)
  • Rachael Ray’s Balsamic Drizzle
  • Mozzarella Fresca (Fresh Mozzarella)
  • Fresh Tomatoes

Layer your basil on the plate or platter, then arrange the tomato slices and slices of Mozzarella on top. Drizzle the entire production with the Balsamic Drizzle. This beauty makes a perfect appetizer, quick lunch, OR a replacement for tossed salad with pasta or pizza.

Balsamic Vinegar Drizzled Tomato, Mozzarella, and Basil Appetizer


Filed Under: Appetizers, Gluten Free, Herbs in Recipes, Quick and Easy Recipes, Rachael Ray, Vegetarian Dishes Tagged With: appetizer recipes, appetizers, basil recipes, mozzarella recipes, tomato recipes

Empire Bacon Mayo: Hold On to Something, Bacon Lovers

May 2, 2016 By Joi Sigers

Bacon Deviled Eggs with Empire Bacon Mayo

Bacon Deviled Eggs

The April Eat. Feed. Love. Taste Club Box included a jar of bacon-liciousness, Empire Bacon Mayo. One of the recipes included in the box was Bacon Deviled Eggs, which I made, like the very next day. They were out of this world.

The Empire Bacon Mayo is also great on sandwiches, of course, and gives a whole new meaning to BLTs and, as you’d imagine, egg salad sandwiches.

Empire Bacon Mayo
Empire Bacon Mayonnaise
Speaking of egg salad sandwiches, the beauties pictured here (if you have any left, that is) could go on to another life as egg salad.

I often say that a cook is only as good as the ingredients he/she uses. If you want to make the kind of meals that people will be talking about for weeks and even months – you have to arm yourself with the best ingredients you can round up.

But there’s more to it.  It’s all about catching people (and even yourself) off guard and mixing things up. Everyone loves originality – especially when it involves bacon! This mayo is simply wonderful and, quite frankly, is a lot of fun to use.

See Empire Bacon Mayo for more information. You can find the Bacon Deviled Eggs recipe on Eat. Feed. Love. Just click the link!

Bacon Deviled Eggs with Empire Bacon Mayo

Bacon Deviled Eggs with Empire Bacon Mayo

Read my April Eat. Feed. Love. Taste Club Box Review to find out how you can save 20% on this delicious mayonnaise!

Filed Under: Appetizers, Breakfast and Brunch, Daily Gift Ideas for Foodies, Food Reviews Tagged With: Bacon Deviled Eggs, Empire Bacon Mayo Review

Jalapeno Peppers Stuffed with Cream Cheese

August 13, 2015 By Joi Sigers

Stuffed Jalapeno Peppers

Stuffed Jalapeno Peppers, About to Go Into the Oven

When I had to give up gluten and wheat, I knew very well what one of my most painful losses would be – Jalapeno Poppers from Arby’s. I’ve been addicted to them since they first came out.

Truth is, I was always beyond obsessed with Arby’s in every way possible – unfortunately I haven’t been able to eat at one for over a year and a half (they’re surprisingly one of the worst restaurants at providing gluten free options).

Anyway, I’ve now come up with a couple of ways to satisfy my cravings. I could conceivably fry stuffed jalapeno peppers, using gluten free flour and cornmeal – and they’d be fantastic – but my favorite way to satisfy that delicious cream cheese meets jalapeno heat craving is simply to bake them.

It’s easy, delicious, and much healthier than frying them.

Jalapenos and Asiago

Jalapenos and Sargento Medium Asiago “Tastings”

This isn’t any sort of product placement or plug, I just simply LOVE Sargento’s “Tastings” and highly recommend them. They’re the ideal size for keeping on hand in the refrigerator. I always use them up without any being wasted. I always have Asiago and Parmesan in the fridge and mix it up with other varieties as well.

I also list Philadelphia Cream Cheese in the ingredients below – again, I’m not trying to sound like a commercial. It’s simply one of the brands I’m insanely loyal to.

These stuffed jalapeno peppers make delicious appetizers and would be beautiful for game day, Christmas, or any time you want a little pop and personality with your meal.

Gluten Free Stuffed Jalapeno Peppers

12 large Jalapenos
4 oz Philadelphia Cream Cheese, softened
4 oz grated Parmesan, Asiago, or Romano cheese (each works beautifully)
2 TBS chopped Italian Parsley
Salt and Pepper to taste

  1. Pre-Heat oven to 425 degrees.
  2. Going lengthwise (top to bottom, the length of each pepper) – slice off the top quarter of each jalapeno. Scrape out the seeds. You’re making little vessels that you’ll fill with the cheese mixture.
  3. Finely chop up the removed thirds from six of the peppers (use all of them if you can take the heat!).
  4. In a mixing bowl, combine: the reserved chopped pepper, cream cheese, grated Asiago (or Parmesan or Romano) cheese, finely chopped parsley, and salt/pepper.
  5. Fill the peppers with the cheese mixture and arrange on a baking sheet. As you can see in the picture at the top, I use Parchment Paper Pre-Cut Baking Sheets (something I’ve fallen completely in love with – they make clean up SO much easier) – but you can certainly make these without parchment paper.
  6. Bake 15 minutes.

I served mine with Sweet Chili Sauce and never regretted the decision for a single second. However, they are outrageously delicious on their own and don’t require any sauce.

Stuffed Jalapeno Peppers

Stuffed Jalapeno Peppers, About to Go Into My Mouth!

Filed Under: Appetizers, Cooking on a Budget, Cream Cheese Recipes, Game Day, Gluten Free, Vegetables Tagged With: appetizer recipes, appetizers, gluten free appetizers, gluten free stuffed jalapeno peppers, stuffed jalapeno peppers

Refrigerator Pickles Recipe from Food Network’s “Chopped” Host, Ted Allen

June 8, 2015 By Joi Sigers


Food Network’s popular “Chopped” Host, Ted Allen recently shared some of his favorite pickling secrets with AARP. His recipe for Refrigerator Pickles can be complimented with his famous Deviled Eggs (below), for a delicious meal any time of the year.

Ted Allen and his recipe are featured in the June/July 2015 issue of AARP The Magazine.

Refrigerator Pickles

Serves 32

Brine:

  • 10 cloves garlic, peeled
  • 2 cups white vinegar
  • 6 teaspoons kosher salt
  • Several sprigs fresh dill
  • 1 teaspoon celery seed
  • 1 teaspoon coriander seed
  • 1 teaspoon mustard seed
  • 1/2 teaspoon black peppercorns


Vegetables:

  • 6 Kirby cucumbers, quartered lengthwise
  • 6 medium carrots, peeled and cut in half lengthwise
  • A handful of green beans
  • A few pieces of cauliflower
  • 2 jalapeños


Directions:

  1. In a medium saucepan, boil 4 cups of water; reduce to a simmer and add garlic. Cook 5 minutes. Add vinegar and salt; boil. Stir until salt dissolves. Remove from heat.
  2. In two 1-quart Mason jars, add dill, seeds and peppercorns. Using tongs, remove garlic from brine and add to jars. Pack jars with vegetables and chilies.
  3. Bring brine to a boil and pour over vegetables, to cover. Cool, cover and refrigerate. The pickles are best after a few days and keep for up to 3 months.
  4. Nutrients per serving: 33 calories, 2g protein, 6g carbohydrates, 5g fiber, 0g fat, 0mg cholesterol, 32mg sodium


Ted Allen’s Devilish Eggs With Cheddar, Chipotle and Chives

Serves 12

  • 1 dozen large eggs
  • 1/2 cup finely shredded cheddar cheese
  • 1/4 cup mayonnaise
  • 1/4 cup sour cream
  • 2 tablespoons chopped chives
  • 6 teaspoons chopped canned chipotle chilies in adobo sauce, or more to taste
  • 1/2 teaspoon sweet paprika
  • Pinch of kosher salt

Directions:

  1. Put the eggs in a saucepan, cover with cold water by 1 inch, and bring to a boil over high heat. Reduce heat and simmer for 10 minutes; then drain and immediately plunge the eggs into an ice bath to cool.
  2. Peel the eggs, slice in half lengthwise, and scoop out the yolks. Put the whites on a platter. Pass the yolks through a sieve in a medium bowl, or just mash with a fork. Mix in the cheese, mayo, sour cream, chives (reserving 1 teaspoon for garnish), chipotles, paprika and salt.
  3. Use a pastry bag fitted with a 1/2-inch tip to pipe the filling into the whites — or, if you’re less fancy, use 2 spoons. Sprinkle with the reserved chives. Cover loosely with plastic wrap and refrigerate until serving, which should be within one day.

AARP’s website has A LOT of wonderful articles and tons of recipes – great recipes, at that!  I just wrote down the ingredients for a Kale Caesar Salad that I plan to make this week. When I finish up here, I’m going back to check out more of the recipes.

See Also: My Chopped Cookbook Review (love it!)

Filed Under: Appetizers, Food Network, Ted Allen Tagged With: Chopped, Pickle Recipe, Refrigerator Pickles, Ted Allen

Truvia Baking Blends (Review and Recipe Contest)

October 9, 2014 By Joi Sigers

Brown Sugar and Nut Butter Dip or Parfait made with Truvia Brown Sugar Blend

I’ve been a HUGE fan of Truvia since it first hit my grocery shelves. As a true Southerner, I don’t just drink Sweet Tea, I drink it by the gallons. Unfortunately, the calories in sweet tea are otherworldly, so I looked for a better option – one that wouldn’t lead to “scale shock.”

I tried those artificial sweeteners but, guess what? They taste artificial.

Go figure.

Then I tried Truvia and BAM! I fell in love with the first sip and have never looked back.  Truvia in tea and coffee tastes JUST like sugar but without the calories. Win, win, win.

Since I’m such a Truvia groupie in every conceivable way when I was contacted about reviewing Truvia’s new baking blends I was over the moon excited.  I even read the e-mail twice.. “Baking blends? I had no idea they were now making baking blends?  God it just too good to me..”

And He is, but that’s beside the point.

Truvia Baking Blends

Truvia Brown Sugar Blend and Baking Blend

Truvia just launched its new Truvia Brown Sugar Blend, a mixture of Truvia and Brown Sugar that offers a brown-sugar-like taste, texture, and volume, with 75 percent fewer calories than regular brown sugar.  I’ve used this Brown Sugar Blend in gluten free chocolate chip cookies, fried apples, baby carrots, sweet potatoes, and in a delicious Brown Sugar Nut Butter Fruit Dip or Parfait – (Recipe Below).

I’ve also sprinkled it on oatmeal, which is an experience all in itself.  If you’re as familiar with Truvia as I am, you won’t be surprised when I tell you that this brown sugar blend produces the exact same taste you get with traditional brown sugar.

The. Exact. Same.

It tastes just as sweet and leaves absolutely no aftertaste or unpleasantness.

Truvia also has another wonderful calorie saver, their Baking Blend.  What have I used this particular blend in? Only everything. Like the Brown Sugar Blend, it performs exactly like its calorie-rich counterpart.
To celebrate their delicious new baking blends,  Truvia® is giving all cooking and baking enthusiasts the chance to share their talents in the Truvia Baking Star contest. Bakers can submit videos that feature their own original Truvia Brown Sugar Blend recipe, to win a trip to New York and an all-expense paid professionally-filmed baking video that will be promoted by the brand.  3 Finalists will be sent to NYC for a bake-off, where they’ll meet Truvia brand reps, reporters and editors of top media publications, and four YouTube bloggers (named below).

For recipes with Truvia Brown Sugar Blend and more info on the contest, check out videos from four of YouTube’s top food vloggers: Gaby Dalkin, Byron Talbott, April Moore and Joanne Ozug, all who created recipe videos to kick-off the contest.

Contest Deadlines:

Baking Star Video Entry Period ends—10/14
Public Voting – 10/21-10/30
Semi Finalist Notified – 10/30 – 11/17
Baking Star Bake-Off NYC event – 11/19

Brown Sugar and Nut Butter Dip or Parfait 6

Brown Sugar and Nut Butter Fruit Dip (or Parfaits)

Three Ice Cream Scoops of Yogurt (I usually use The Greek God’s Honey Yogurt)
1 TBS Black Chia Seeds (or Sunflower seeds)
1-1/2 TBS Truvia Brown Sugar Baking Blend
1 tsp Justin’s All Natural Almond Butter or Chocolate Hazelnut Butter Blend

Simply combine the first four ingredients  in a bowl or parfait-type glass. As you can see from the picture above, it looks so pretty you won’t want to stir the ingredients into one another – but stir you must (or at least should – after all, you want the flavors to mingle and get to know one another).

Optional for Dip: Fruit or Animal Crackers to serve as “dippers’

Optional for Parfaits: Add fruit, granola. or nuts on the bottom or on the top.

Yield: The recipe above makes one serving

Brown Sugar and Nut Butter Dip or Parfait
This is one of those recipes you can totally make your own. Choose your favorite yogurt and add any fruit and/or nuts you like.  Because of the fact that I’m obsessed with “super foods” and healthy ingredients, I DO recommend adding Chia Seeds or, at the very least, sunflower seeds. Chia Seeds are uncommonly good for you and the flavor they bring to the party is wonderful.

I also highly, highly recommend using either Justin’s Chocolate Hazelnut Butter Blend or Justin’s Maple Almond Butter – both are AMAZING in this dip/parfait.  These deliciously addictive blends are usually found in the health food section of supermarkets.

Finally, using Truvia Brown Sugar Blend is a must here. What’s the point of making a healthy fruit dip or parfait if it’s going to be packed with extra calories, right?!

Grab these wonderful Truvia Baking Blends as soon as you can. I’m already using them to test out different Thanksgiving and Christmas recipes.  Thanks to Truvia, maybe we won’t all gain 5 pounds this holiday season!

Brown Sugar and Nut Butter Dip
You’re going to LOVE using Truvia Baking Blends in your favorite recipes!
Brown Sugar and Nut Butter Dip

Filed Under: Appetizers, Christmas Baking, Dips and Sauces, Food Reviews, Health Food Reviews, Quick and Easy Recipes Tagged With: counting calories, Food Reviews, fruit dip, yogurt fruit dip

Bacon-Wrapped, Cream Cheese Stuffed Jalapenos Recipe (with a Vegetarian Option)

September 23, 2014 By Joi Sigers

Bacon Wrapped Cream Cheese Stuffed Jalapeno Peppers

Bacon. Cream Cheese. Jalapenos.  Enough said, right?

These oven-baked little beauties are as delicious as they are easy to make. They’re also easy on the budget – something else we’re all looking for these days.

14 jalapeno peppers
4 ounces cream cheese, softened
7 bacon strips
berry sauce or ranch dressing (optional)

First of all, be careful when working with jalapeno peppers. If you want to be entirely safe, use disposable gloves. Handling the inside of a jalapeno can burn your skin – and if you transfer the oils to your eyes…. AGONY! Take extra precautions and don’t touch your face, whatever you do.

Can you tell that this gal has been there, done that?

For Bacon-Wrapped/Cream Cheese-Stuffed Jalapenos

  1. Cut a slit in the peppers – lengthwise (pictured above). Remove the seeds and membranes and discard.
  2. Spread about a teaspoonful of softened cream cheese into each pepper.
  3. Cut bacon strips in half and partially cook in a skillet. You want them to be pliable, so be sure not to overcook them.
  4. Wrap each cheese stuffed pepper with bacon and secure with a toothpick.
  5. Place in an ungreased baking dish and bake, uncovered, at 350 degrees for 20 – 30 minutes.  The longer you bake the peppers, the milder they’ll taste. If you have plenty of peppers to spare, I’d suggest testing one after 20 minutes, then (if that’s too hot) again at 30 minutes.  They’ll actually be fine cooked for 45 minutes.

Serve either by themselves or with a little dish of ranch dressing.  The bacon wrapped jalapenos drizzled with Ranch dressing are extra pretty and taste fantastic. The ranch helps tone down the heat of these little guys.

Vegetarian Alternative? Just skip the part about wrapping the peppers in pork shawls. Place them in the oven, as is.  Either serve plain or use a simplistic berry sauce like the one described below the picture.

Cream Cheese Stuffed Jalapenos with Berry Sauce Drizzled Over Them

For the vegetarian (or baconless) version, I like to make a really simple little “Berry Sauce.” For the peppers shown here, I heated 4 TBS Red Pepper Jelly and 1 TBS Raspberry Preserves until I achieved the consistency I needed for drizzling.  You can combine basically whatever fruit preserves you have on hand with red pepper jelly – I just prefer the sweetness of raspberry preserves.  Drizzled across the top, it makes an already impressive and pretty dish even more so.

This method creates a sauce that will thicken FAST, so drizzle asap. If it begins to get too thick to drizzle.. which it will… sit your bottle in a cup of hot water.

Cream Cheese Stuffed Jalapenos


If you’re feeling adventurous, here’s a Copycat Recipe for Arby’s Bronco Berry Sauce from Top Secret Recipes!

Filed Under: Appetizers, Christmas Recipes, Cream Cheese Recipes, Gluten Free Tagged With: bacon wrapped cream cheese stuffed jalapenos recipe, Christmas Appetizers, cream cheese recipes, gluten free appetizers, gluten free recipes, stuffed jalapenos recipe

Spicy Cheesy Kale Chips

August 25, 2014 By Joi Sigers

Spicy Cheesy Kale Chips

2-1/2 cups of raw cashews
1 large red bell pepper
2-3 red Fresno peppers
1-2 tsp lemon juice (to taste)
2 tsp mineralized sea salt
2 Tbs. nutritional yeast
3 bunches curly kale

For best results, use ultra-fresh organic vegetables.

Soak the cashews in water for 3-4 hours. Combine with the stemmed and seeded peppers, lemon, salt and yeast in a blender. Puree. Taste the mixture, and if it needs it, add more salt and/or lemon.

Strip the stems from the kale leaves-you can do this easily by holding the end of the stem in one hand, and firmly running the other hand up the sides of it, dislodging the leaf. The tough part of the stem will come off, leaving the tenderer part intact.

In a large bowl, combine the Kale with the blended mixture, using your hands (evenly) as possible distribute the mixture. Lay the leaves onto a dehydrator racks, crowding them but not stacking them. Dehydrate at 105° F for 12-16 hours, until very crisp. Store in sealed zip bags. If you don’t get them dry enough they will soften in the bag.

If you don’t have a dehydrator they can be laid out on a rack or over a pan in the oven with the temperature set as low as possible. The time to dehydrate will be greatly reduced, probably to about an hour or even less.

Recipe and Photo Credit: Paulding & Co. recipes.

Filed Under: Appetizers, Vegetables Tagged With: kale chips recipe, spicy kale chips recipe

Kale Chips: Simple Recipe for a Healthy Snack You’ll Love

October 17, 2013 By Joi Sigers

Kale

I’m a HUGE fan of kale – in smoothies, salads, pasta dishes, soups.. basically anywhere and everywhere I can sneak it in. One of my favorite ways to enjoy the tasty, inexpensive, and nutritious vegetable is Kale Chips. Even though I love kale madly, when I first heard about the concept of Kale Chips, I can’t say I was overly enthusiastic (or hopeful).

Fortunately, I was pleasantly surprised and have made Kale Chips countless times since.

You’ll love the simplicity of the recipe and… I promise.. the flavor.

What you’ll need for the Kale Chips:

  • Start with a beautiful bunch of curly kale (like the one pictured above). Wash the leaves and pat them dry.
  • 1 Tablespoon Extra Virgin Olive Oil
  • 1 – 2 teaspoons Rachael Ray’s pink Himalayan Salt (or Kosher salt, table salt, sea salt… the pink Himalayan’s simply my own personal favorite)

Pre-Heat the oven to 350 degrees. After the kale has been washed and dried, cut the leaves into pieces. The size is up to you, but I generally aim for “Dorito” size or a little smaller.

VERY IMPORTANT: Cut around the thick spine that runs down the length of the leaves. I’ve yet to find any use for these spines. I throw them out in the yard for rabbits, racoons, and possums. They’re a hit with this crowd.

Put the chips waiting to happen in a large bowl and add the tablespoon of EVOO.  When you see the impressive amount of kale and the comparatively small amount of EVOO, you’ll probably think, “She’s nuts, it’s going to take a lot more than this!” – but once you add the oil and (using your hands), coat the leaves, you’ll find that the tablespoon is sufficient.

Lay the pieces of kale on a large baking sheet, in a single layer – make sure no one’s riding piggy back on anyone! Evenly salt each piece.

Bake for 10 to 15 minutes. Be sure to keep a close eye on them – they’ll burn without a moment’s notice.

These delicious kale chips will amaze you. They’re so good! The crispiness, the hint of saltiness, and the unexpectedness of them will make them popular with everyone, even kids.

Fun Ways to Enjoy Kale Chips:

  • I like to keep healthy snacks at the end of the kitchen bar – someplace everyone can enjoy a quick and tasty snack. Kale chips are ideal.
  • When watching tv, we all get the munchies, don’t we?! Kale chips are satisfyingly yummy and fun to eat.
  • Take them along on car trips to keep french fries from tempting you off the road.
  • They’re a delicious, healthier option to traditional salad or baked potato toppings.

As with everything you make in the kitchen, be sure to experiment with different flavors and additions. Along with the salt, you could also add white sesame seeds, paprika, cayenne pepper, black pepper (I love black pepper on kale chips), garlic, or even Parmesan cheese. The possibilities are endless.  When getting creative, though, I’d highly recommend just doing a few at a time the first time through.

Kale Chips

You can find quite a few Kale Cookbooks on Amazon. This superfood is a lot more versatile than most people think!

Filed Under: Appetizers, Food Blog, Health and Fitness, Heart Healthy Foods and Recipes, Quick and Easy Recipes, Vegetables, Vegetarian Dishes Tagged With: healthy snaks, kale, kale chips

Next Page »

Primary Sidebar

Welcome to the Get Cooking Food Blog

My name is Joi (“Joy”) and Get Cooking is where I celebrate some of my greatest passions: Recipes, kitchen gadgets, gluten free food reviews, gluten free recipes, pig collectibles, chocolate, cookbooks, and coffee.

Lots of coffee…


2020 Christmas Gift Guide: Gift Ideas for Cooks and Foodies!

  • Email
  • Instagram
  • Pinterest
  • RSS
  • Twitter

Search for Recipes and Reviews

What’s New on the Food Blog?

  • An INGENIOUS Way to Prepare and Eat Chicken: Where Has this Method Been all My Life?!
  • Fellow Purple Fanatics, You’re Going to LOVE These Dishes
  • Quick and Easy Meal Ideas: “Nights Off” at Home with Less Stress and Less Mess
  • 2020 Gift Ideas for Cooks and Foodies: A Beautiful Handmade Ceramic Bowl
  • Chili Tips of the Trade and a Kitchen Tool You Absolutely MUST Have
  • Clorox Scrubmates with Handheld Scrubber
  • The Duke’s Mayonnaise Cookbook: A Cookbook Deserving of the Name!
  • The Way to this Rachael Ray Collector’s Heart….

Gluten-Free Recipes

A Wonderful Gluten-Free and Vegetarian Cookbook: Whole Bowls by Allison Day

Pumpkin Stuffed Green Lentil Cannelloni

Gluten-Free Pumpkin Stuffed Green Lentil Cannelloni

Gluten-Free Lasagna with Explore Cuisine Green Lentil Lasagna Noodles

Easy Gluten-Free Lasagna with Explore Cuisine Green Lentil (No Boil!) Noodles

Tostadas with Refried Beans and Tomatoes

Fast & Easy Summer Meal: Meatless Tostadas

Gluten-Free White Chocolate and Pecan Cookies

Gluten Free Cranberry Pecan Cookies

Gluten Free Pecan Sandies

Gluten Free Pecan Sandies Recipe

Footer

T-fal… As Good as Good Gets

The T-Fal Cookware Set (Amazon link), above, is available in several gorgeous colors.

Subscribe to Get Cooking

Fill in the form below to receive updates through e-mail whenever something new has been added to the food blog.


Powered by FeedBlitz

  • Email
  • Instagram
  • Pinterest
  • Twitter

Contact me through e-mail at joisigers@aim.com and/or connect with me through social media (see above)!

I do not claim to have taken all of the photographs on this website. I did not take any of the “product” or “affiliate” merchandise photos, nor do I claim to own them. If you are a photographer that sees something you want removed, simply e-mail me!</font size>

Copyright © 2020 Get Cooking Food Blog   xml sitemap   Privacy Policy   Color Me Gluten Free!